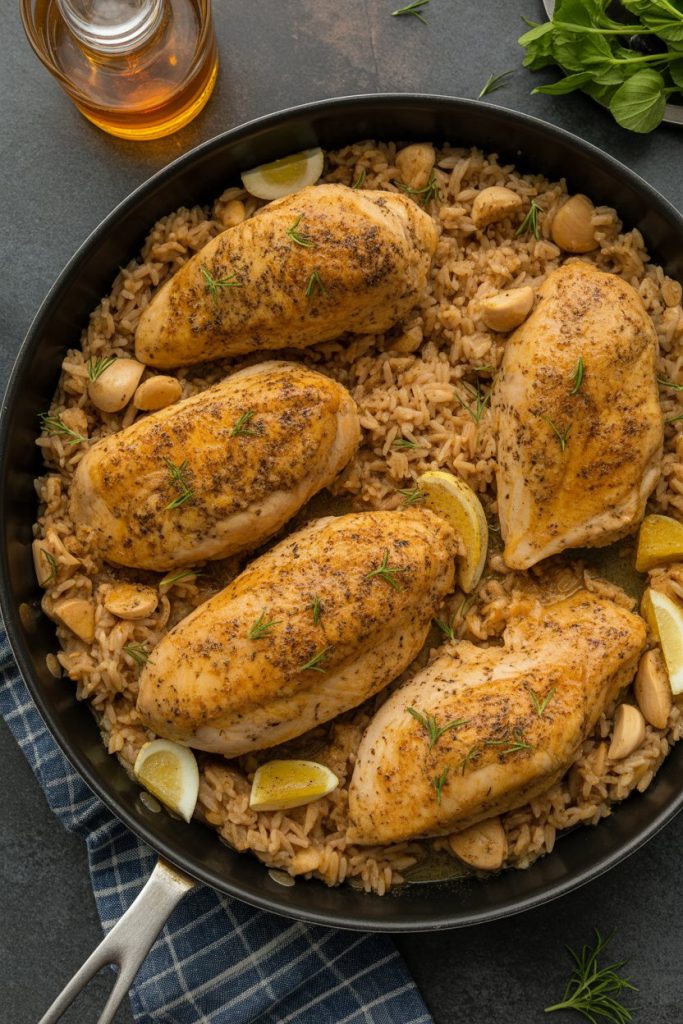
One-Pan Honey Butter Garlic Chicken & Rice | Skillet Dinners
Alright, busy weeknight warriors and flavor fanatics, listen up! Are you tired of complicated recipes that leave your kitchen looking like a disaster zone? Do you crave a meal that's bursting with sweet and savory goodness, but comes together with minimal fuss? Your culinary prayers have been answered! Get ready to discover your new obsession: One-Pan Honey Butter Garlic Chicken & Rice. This isn't just dinner; it's a golden, aromatic, and unbelievably easy triumph, perfect for those nights when you want maximum deliciousness with minimum cleanup. Welcome to the world of effortless Skillet Dinners!
Why This Recipe is Awesome
Short version: it’s flavorful, forgiving, and lives up to the "one-pan" promise (fewer dishes = instant win). The chicken crisps up, the rice soaks up a sweet-savory honey-butter-garlic bath, and you don’t need a ton of fancy gear.
Long version: the sauce balances sweet honey with rich butter and punchy garlic. The rice cooks right in the sauce so every grain tastes like it knows what it did to deserve this. It’s basically comfort food with a tiny bit of flex. Idiot-proof? Mostly. Even I didn’t mess it up.
Ingredients Youll Need
| Ingredient | Amount | Notes |
|---|---|---|
| Chicken thighs (boneless, skin-on) | 6 (about 2 lb / 900 g) | Skin-on for crisp; bone-in works but adjust cook time |
| Salt & black pepper | To taste | Season well—don’t be shy |
| Olive oil | 1–2 tbsp | For searing |
| Unsalted butter | 4 tbsp (½ stick) | Divided — we’ll melt some into the rice |
| Garlic | 4–6 cloves, minced | Use fresh—garlic powder is sad here |
| Long-grain white rice | 1 ½ cups (uncooked) | Jasmine or basmati works. See subs below |
| Low-sodium chicken broth | 3 cups | Hot is better so rice starts cooking |
| Honey | 3 tbsp | Adjust to your sweet-to-savory preference |
| Fresh lemon juice | 1 tbsp | Brightens the sauce—don’t skip |
| Smoked paprika | 1 tsp | Optional, but it’s delicious |
| Fresh parsley (optional) | 2 tbsp, chopped | For garnish |
Step-by-Step Instructions
- Preheat your oven to 375°F (190°C). Grab an oven-safe skillet or Dutch oven—cast iron is perfect. Pat the chicken dry with paper towels and season both sides with salt, pepper, and a pinch of smoked paprika if using.
- Heat 1–2 tablespoons olive oil in the skillet over medium-high heat until shimmering. Add the chicken skin-side down and sear for about 4–5 minutes until the skin turns golden-brown and crispy. Flip and sear the other side 2 minutes. Don’t crowd the pan—work in batches if needed.
- Remove the chicken to a plate. Lower heat to medium. Add 2 tablespoons butter to the skillet and let it melt. Toss in the minced garlic and sauté 30–45 seconds until fragrant. Burned garlic = sad sauce, so watch it closely.
- Add the uncooked rice to the pan and stir to coat with the butter-garlic mix. Toast the rice for 1–2 minutes; you should smell it getting nutty. Toasting helps keep the rice fluffy instead of mushy.
- Pour in 3 cups hot chicken broth, honey, and lemon juice. Stir to combine and scrape any brown bits off the bottom—that’s flavor, don’t leave it behind. Taste the liquid and add a little salt if needed (broth saltiness varies).
- Nestle the seared chicken into the rice mixture, skin-side up. Dot the remaining 2 tablespoons of butter on top of the rice and chicken. Bring the pan to a gentle simmer on the stovetop—about 2 minutes.
- Cover the skillet with a tight-fitting lid or aluminum foil. Transfer to the preheated oven and bake for 22–28 minutes, until the rice is tender and the chicken reaches 165°F (74°C). If you used bone-in thighs, expect closer to 35–40 minutes.
- Remove from the oven and let it rest, covered, for 5 minutes. Sprinkle with chopped parsley and give everything a gentle stir so the rice soaks up any remaining sauce. Serve warm, and prepare yourself for compliments.
Common Mistakes to Avoid
- Not drying the chicken before searing. Wet chicken won’t crisp—pat it dry like you mean it.
- Skipping the rice toast. If you don’t toast the rice, it can turn gummy. Two minutes of love makes a huge difference.
- Using cold broth. Cold liquid shocks the rice and messes with the cook time. Warm it up first.
- Lifting the lid while it bakes. Resist the urge to peek—loss of steam ruins the rice texture. Seriously, don’t peek.
- Using the wrong rice. Instant rice or sushi rice will behave differently. Stick to long-grain white unless you like surprises.
Alternatives & Substitutions
Out of something? No sweat. Here’s how to adapt without panicking.
- Brown rice: Use 1 1/2 cups brown rice, but increase broth to 3 1/2–4 cups and bake 35–45 minutes. Brown rice needs more time and liquid—don’t skimp.
- Chicken breasts: Use boneless skinless breasts, but cut them into thicker pieces and watch internal temp closely. They cook faster than thighs and dry out easier.
- Bone-in thighs: Totally fine. Increase bake time to 35–40 minutes and use a meat thermometer to confirm doneness.
- Broth swap: Vegetable broth works if you want a lighter flavor or are out of chicken stock. If you only have bouillon, dissolve it in hot water first.
- Butter substitute: Use equal olive oil for a dairy-free version, but you’ll lose that silky honey-butter finish. FYI: butter = mood.
- Honey alternatives: Maple syrup or agave works, but adjust to taste (maple can be stronger).
- Make it vegetarian: Swap chicken for thick-cut roasted cauliflower or large portobellos and use vegetable broth. Crisp the veggies first for texture.
FAQ (Frequently Asked Questions)
- Can I use frozen chicken? Sure, but thaw it first. Cooking from frozen will steam instead of sear, and you lose that crispy skin magic.
- What rice should I use? Long-grain white, like jasmine or basmati, gives the best texture. Brown rice works with adjustments (see above). Don’t use risotto rice unless you know what you’re doing.
- Can I skip the oven and finish on the stove? You can, but you’ll need a very tight-fitting lid and constant low simmer—30–35 minutes. The oven gives more even heat and a prettier finish, IMO.
- Is it freezer-friendly? Yes. Cool completely, then freeze in portions. Thaw in the fridge before reheating. Reheat gently so the rice doesn’t dry out.
- Can I make this spicy? Add red pepper flakes while sautéing garlic, or toss in a diced jalapeño. My spice-averse loved this with just a pinch.
- How do I reheat without drying the chicken? Reheat covered in a 325°F oven for 10–15 minutes, or microwave with a splash of water/broth to keep rice moist.
- Can I use margarine instead of butter? Technically yes, but why hurt your soul like that? If you must, go for a high-quality plant-based buttery spread.
Final Thoughts
There you go: a one-pan meal that checks the boxes—easy, cozy, and kinda fancy-looking without trying too hard. The honey-butter-garlic combo plays nicely with the chicken and rice, and cleanup is mercifully minimal. Want to impress company? Add a simple green salad and a lemon wedge.
Remember: cooking should be fun, not stressful. Play with the flavors, make it your own, and if it goes slightly sideways, nobody dies—they just eat slightly different dinner. Now go impress someone—or yourself—with your new culinary skills. Youve earned it!
Leave a Reply